
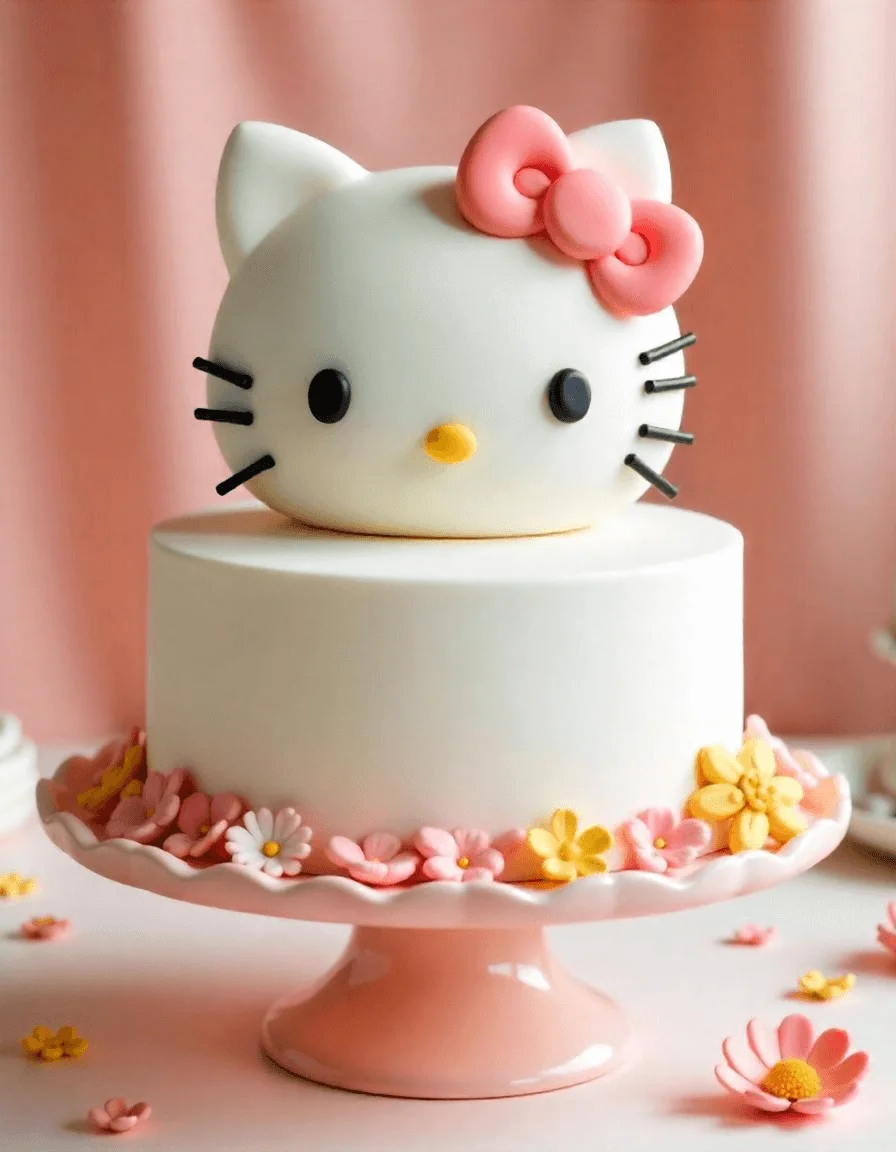
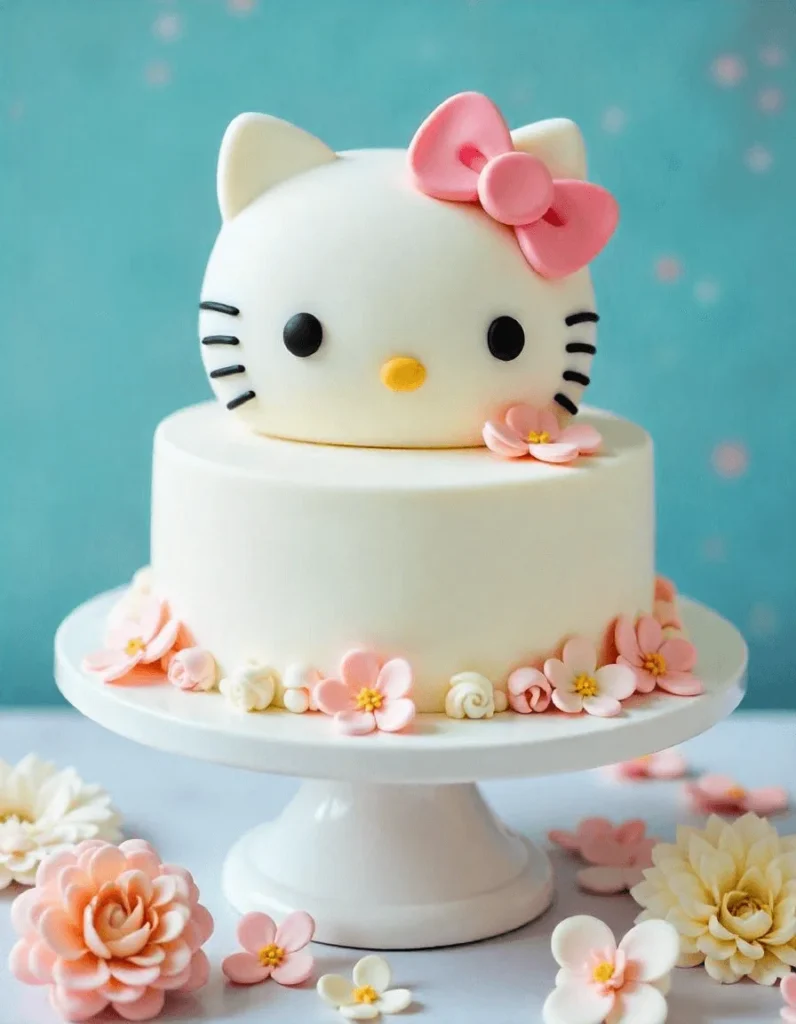
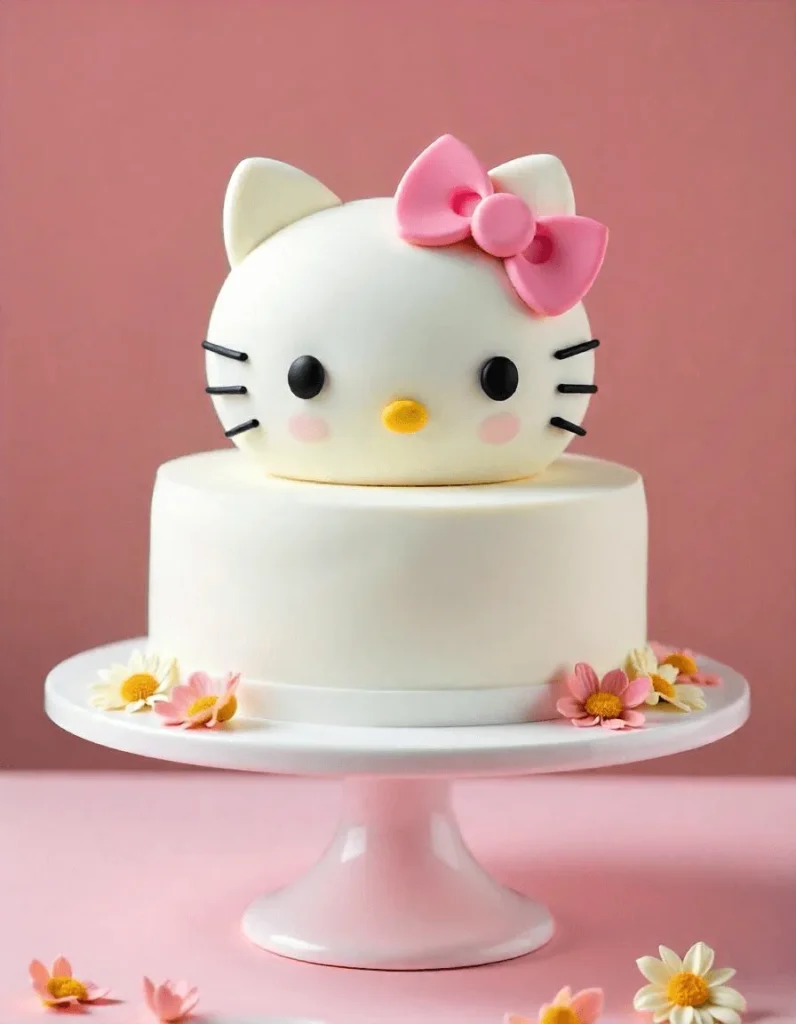
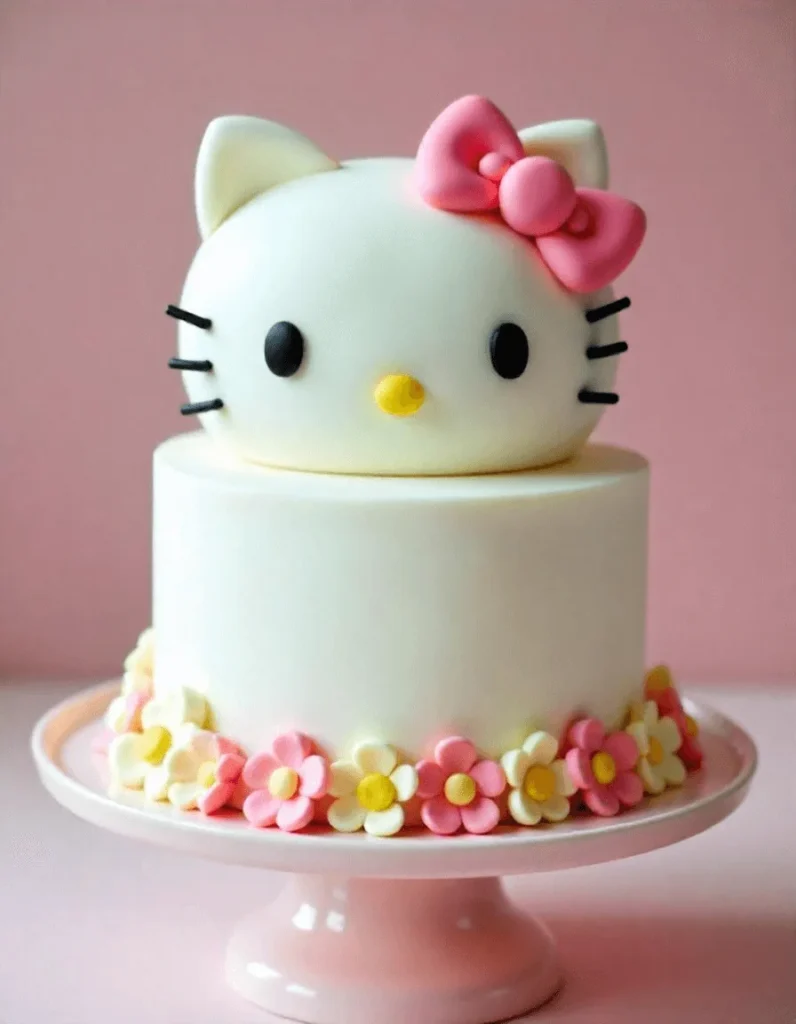
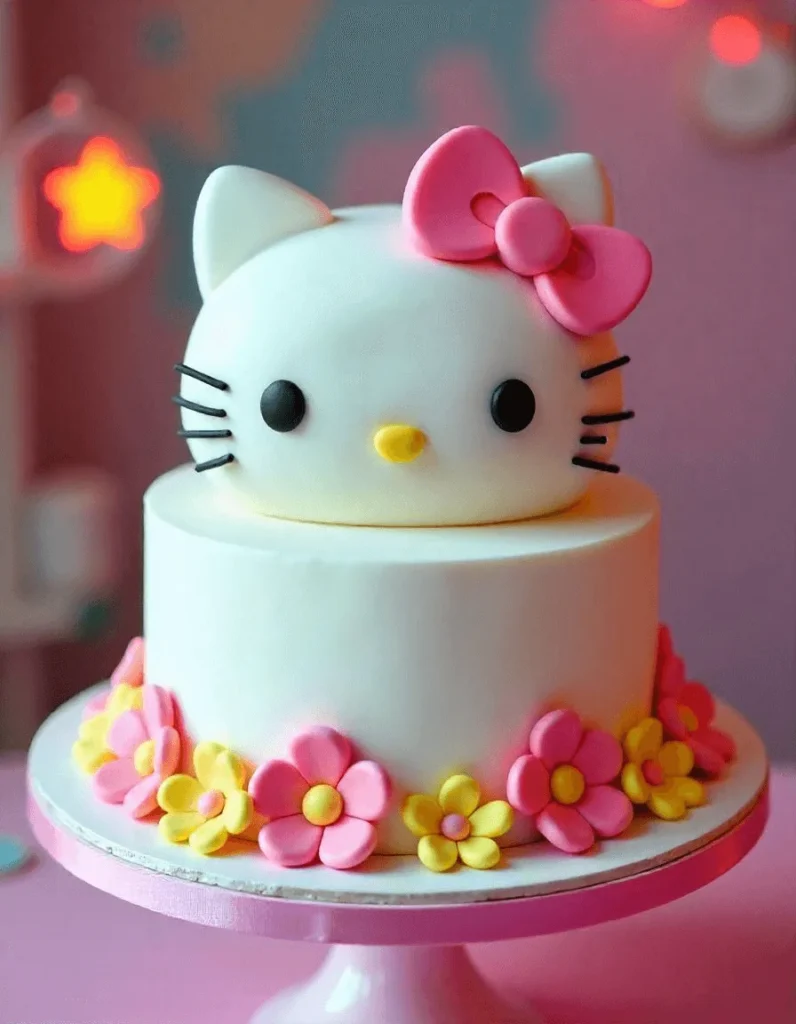
A Hello Kitty cake is the perfect way to add a fun and creative touch to any celebration. Loved by fans of all ages, this cute design works well for kids’ birthdays, baby showers, and more. Whether you’re an experienced baker or a beginner, decorating a Hello Kitty is a fun challenge. In this guide, we’ll show you how to create a beautiful Hello Kitty cake step by step. From the essential tools to decorating tips, you’ll learn everything you need to make your cake stand out. Get ready to master Hello Kitty cake decorating and impress your guests with a cake that’s both charming and delicious!
Essential Tools and Ingredients for Decorating a Hello Kitty Cake
Cake Base: What Type of Cake Works Best (e.g., Vanilla, Chocolate, or Sponge Cake)
For a Hello Kitty cake, the base is key to both taste and texture. Vanilla cake is a classic, offering a light and sweet flavor that complements any decoration. Chocolate has a rich, decadent taste that balances the sweetness of frosting and fondant. Sponge cake is airy and soft, absorbing moisture to stay fresh longer. Choose the flavor based on your guests’ preferences and the overall theme of your celebration. This ensures your Hello Kitty cake is as delicious as it is beautiful
Fondant: Why Fondant Is Essential for Shaping Hello Kitty’s Face and Features
Fondant is the go-to choice for creating clean, smooth surfaces and detailed shapes on your Hello Kitty cake. Unlike buttercream, fondant provides a flawless finish, allowing you to easily shape Hello Kitty’s face, whiskers, and bow with precision. Its smooth texture makes it perfect for covering the entire cake or for creating detailed features, like the eyes and nose. Fondant is also versatile—it can be colored and molded into any shape, ensuring your design remains sharp and professional-looking. Using fondant ensures your Hello Kitty cake not only looks great but also holds its shape for hours
Buttercream Frosting: How to Use Buttercream for Detailing and Smooth Finishes
Buttercream frosting is perfect for adding fine details and achieving a smooth, polished finish on your Hello Kitty cake. Here’s how to use it effectively:
- Base Coat: First, apply a thin layer of buttercream frosting all over the cake to create a smooth base. Use an offset spatula to spread it evenly, ensuring a clean surface.
- Smooth Finish: For a flawless look, use a bench scraper to smooth the buttercream, removing excess frosting and achieving a sleek finish.
- Details: Once the base is set, use a piping bag fitted with various tips to add fine details like Hello Kitty’s whiskers, bow, and facial features. Buttercream can be piped easily for precise decoration.
- Blending: Use a little extra buttercream to blend fondant edges or to add texture to the design, ensuring a seamless transition between different elements.
Buttercream allows for both creativity and ease, making it an essential tool for any Hello Kitty cake decorator
result every time
Cake Decorating Tools: Must-Have Tools for Precision
To create a detailed and professional-looking Hello Kitty cake, having the right tools is essential. Firstly, piping bags and tips are crucial. They allow you to add intricate details like Hello Kitty’s whiskers, bow, and facial features. Additionally, a variety of tips provides flexibility, allowing you to create fine lines for whiskers and larger tips for bold shapes like the bow.
Next, fondant smoothers are a must-have for achieving a flawless finish. These tools help eliminate air bubbles and wrinkles when applying fondant, ensuring a smooth, professional look.
Moreover, an offset spatula is perfect for spreading buttercream or fondant evenly. This tool gives you better control, especially when covering the cake’s surface smoothly.
Finally, a rolling pin is essential for rolling out fondant evenly. It ensures a consistent thickness, whether you’re covering large areas or cutting out small fondant shapes for Hello Kitty’s face.
With these tools, you’ll have the precision and control needed to create a beautiful and polished Hello Kitty cake.
Step-by-Step Guide to Decorating Your Hello Kitty Cake
Prepare the Cake: How to Bake and Shape Your Hello Kitty Cake
Preparing your cake is the first step to creating a beautiful Hello Kitty design. Here’s a simple step-by-step guide:
- Bake the Cake: Start by baking your chosen cake flavor in round cake pans. You can use 8-inch or 9-inch pans for a classic Hello Kitty shape. Let the cake cool completely before working with it to avoid any melting or shifting of decorations.
- Level the Cake: Once the cake is cool, use a serrated knife to level the top of each layer. This ensures an even base for decorating and makes it easier to stack the layers.
- Shape the Cake: To create the rounded shape of Hello Kitty’s face, you may need to trim the edges slightly. If you’re using a round cake, it’s usually simple to carve a small, gentle curve at the top to resemble Hello Kitty’s head.
- Stack the Layers: Place one cake layer on your cake board and apply a thin layer of buttercream to secure it. Add the second layer, and continue stacking if using multiple layers.
By following these steps, you’ll have a perfectly shaped cake, ready for the next phase of decorating your Hello Kitty masterpiece
Cover with Fondant: Tips on Rolling and Applying Fondant Smoothly for a Flawless Look
Covering your Hello Kitty cake with fondant gives it a smooth, professional finish. Here’s how to do it step by step:
- Prepare the Fondant: Begin by kneading the fondant until it becomes soft and pliable. If necessary, add a little bit of cornstarch or powdered sugar to prevent sticking.
- Roll the Fondant: Dust your work surface with a small amount of cornstarch or powdered sugar to prevent sticking. Use a rolling pin to roll the fondant to about 1/8-inch thickness. Ensure it’s large enough to cover your entire cake with some extra to spare.
- Lift and Position: Carefully lift the rolled fondant using your rolling pin or a fondant lifter. Gently drape the fondant over the cake, ensuring it’s centered.
- Smooth the Surface: Use a fondant smoother to gently press the fondant down, starting from the top and working your way to the sides. Smooth out any air bubbles and wrinkles by gently lifting the fondant and re-smoothing.
- Trim the Edges: Once the fondant is smooth, trim off the excess around the base of the cake using a sharp knife or pizza cutter, leaving a neat edge.
By following these steps, you’ll achieve a perfectly smooth and seamless fondant layer, creating the perfect foundation for your Hello Kitty cake design
Create Hello Kitty’s Face: Step-by-Step on How to Form the Iconic Hello Kitty Face (Eyes, Nose, Whiskers, and Bow)
Creating Hello Kitty’s face is the most fun and detailed part of the cake decorating process. Here’s how to do it step by step:
- Form the Eyes: Roll two small balls of white fondant and flatten them into discs for the eyes. Then, create two smaller black fondant balls for the pupils and place them in the center of the white discs. Position the eyes on the cake to ensure they are evenly spaced.
- Create the Nose: Roll a small piece of yellow fondant into a ball and gently flatten it to form Hello Kitty’s nose. Place it between the eyes, slightly lower than the center, to match her iconic face.
- Shape the Whiskers: Roll three thin ropes of black fondant for each whisker on both sides of the face. Using a sharp tool or knife, carefully trim the edges and place them symmetrically around the nose.
- Make the Bow: Roll out a small amount of red fondant and shape it into a bow. Start by creating two loops for the bow and a small piece for the center. Attach the bow to the top-left side of the cake, above the eyes.
By following these steps, you’ll bring Hello Kitty’s signature face to life with precise, simple fondant shapes that will make your cake instantly recognizable and adorable
Add Details: Incorporating Small Details Like the Bow, Facial Features, and Other Decorations
The details bring your Hello Kitty cake to life and make it stand out. Here’s how to add those perfect finishing touches step by step:
- Refine the Bow: If you want to add more dimension to the bow, use a small amount of white fondant to create a decorative line across the center of the bow. This will give it a more realistic look.
- Enhance the Eyes: To make the eyes pop, you can add a tiny white dot of fondant or edible paint to the pupils for a glossy effect. This gives Hello Kitty a cute, sparkling look.
- Whisker Details: For added detail, you can gently press a small ball tool along the whisker lines to make them appear more defined, giving the face more depth.
- Additional Décor: To complete the design, consider adding small decorative accents around the face. You could add pink cheeks by lightly brushing edible pink dust or shaping small fondant circles to place on either side of the nose.
- Final Touches: If desired, add extra fondant flowers, hearts, or other small embellishments around the cake for a personalized touch. This helps to enhance the Hello Kitty theme and make the cake even more eye-catching.
By following these steps, you’ll give your Hello Kitty cake a professional and detailed finish, making it both charming and unique
If you love creating themed cakes, check out our guide on how to make the perfect Barbie cake for more fun and creative ideas!
Creative Hello Kitty Cake Design Ideas

Classic Hello Kitty Design: Using Simple, Bold Colors for a Timeless Look
To achieve a timeless Hello Kitty design, it’s important to focus on simple, bold colors. First, stick to a color palette of white, red, yellow, and black. These colors are iconic for Hello Kitty and create a striking contrast that keeps the design clean and clear.
Next, use red fondant for the bow. This vibrant color is central to Hello Kitty’s look and will immediately catch the eye, making the design stand out. Position the bow above one of her eyes for the classic look.
Additionally, use black fondant for the eyes, whiskers, and pupils. The bold black stands out sharply against the white of the face, ensuring Hello Kitty’s facial features are easily recognizable.
Furthermore, add a small yellow fondant ball for the nose. This bright pop of color complements the other elements, providing a balanced and visually appealing look.
Finally, keep the background simple. Use smooth white fondant to cover the cake, letting the Hello Kitty face and bow be the main focus of the design.
By following these steps, you’ll create a classic Hello Kitty cake with a clean, bold, and timeless look that will impress everyone Kitty design that’s simple yet eye-catching, making the cake both adorable and memorable
Themed Hello Kitty Cakes: Adding Elements Like Bows, Flowers, or Other Sanrio Characters for a More Elaborate Design
To elevate your Hello Kitty cake, you can incorporate fun, themed elements that enhance the overall design. First, add more bows. Create smaller bows using red fondant and place them around the sides of the cake or near the base. This helps maintain a consistent theme while adding a playful touch.
Next, consider incorporating flowers. Fondant or edible flowers in bright colors like pink, yellow, or purple can be placed around Hello Kitty’s face or along the edges of the cake. These flowers add a festive, cheerful element to the design.
Additionally, if you want a more elaborate cake, include other Sanrio characters. For example, you can create small fondant cutouts of characters like My Melody or Keroppi and arrange them around the cake. This adds more character and depth to your design.
Furthermore, colorful accents such as pastel fondant or edible glitter can add an extra pop. Light pink or pastel blue shades complement Hello Kitty’s color scheme, making the cake more vibrant and eye-catching.
Finally, if the cake is for a special occasion, add personalized details like a name or age. This small touch ties the theme together and makes the cake feel unique and memorable.
By following these steps, you’ll create a beautifully themed Hello Kitty cake that’s full of personality and perfect for any celebration for any celebration
Customizable Hello Kitty Cake Designs: Incorporating Colors and Details That Fit a Specific Birthday Theme or Occasion
Customizing your Hello Kitty cake to match a particular theme or occasion adds a personal touch. Here’s how to do it step by step:
- Select a Color Scheme: Start by choosing colors that align with the birthday or event theme. For example, if it’s a princess-themed birthday, consider using soft pinks, purples, and gold accents. Alternatively, for a more festive look, use bright, bold colors like red, yellow, and green.
- Incorporate Theme-Specific Decorations: Add small decorative elements that tie into the theme. For a baby shower, you might want to include fondant baby bottles, pacifiers, or teddy bears around the base of the cake. For a birthday, consider adding balloons, confetti, or a “Happy Birthday” message.
- Personalize the Bow: You can modify Hello Kitty’s signature bow to match the occasion. For example, use a sparkly gold fondant bow for a more elegant look or create a multi-colored rainbow bow for a fun, vibrant design.
- Add Custom Elements: If the birthday person has a favorite character or hobby, consider adding that to the design. For example, if they love a particular sport or animal, small fondant decorations reflecting these interests can be added alongside Hello Kitty’s face.
- Personalized Text: Don’t forget to personalize the cake with the birthday person’s name or age, either using fondant lettering or edible paint. This gives the cake a unique, thoughtful touch.
By following these steps, you can create a customizable Hello Kitty cake that perfectly matches the celebration, making it more meaningful and memorable
Mini Hello Kitty Cakes: How to Decorate Smaller Cakes or Cupcakes with Hello Kitty Designs
Mini Hello Kitty cakes or cupcakes are perfect for parties or special events. Here’s how to decorate them step by step:
1. Bake the Mini Cakes or Cupcakes
First, start by baking mini round cakes or cupcakes. If you’re using cupcakes, make sure the tops are even to provide a smooth surface for decorating. Alternatively, if you’re using mini cake pans, this will ensure the right size for a cute, individual serving.
2. Cover with Fondant or Buttercream
Next, once the cakes or cupcakes are fully cooled, cover them with a smooth layer of white fondant or buttercream. This step acts as the base for the Hello Kitty design. Be sure the surface is smooth, as this makes the decoration process easier.
3. Shape the Face
Then, roll out small pieces of white fondant to shape Hello Kitty’s face. Flatten the fondant and trim it to fit the size of the cake or cupcake. Afterward, gently apply the fondant to create a smooth face shape.
4. Add Eyes, Nose, and Whiskers
For the next step, use black fondant to create small circles for the eyes and place them on the face. Following that, roll a small piece of yellow fondant into a ball and flatten it for the nose, positioning it in the center of the face. Finally, roll black fondant into thin strips for the whiskers and carefully place them on either side of the nose.
5. Decorate with the Bow
Afterward, use red fondant to create Hello Kitty’s signature bow. Shape the fondant into a small bow, and place it on the top-left side of the face. If desired, you can make a smaller bow or even add fondant flowers around the base for extra charm.
6. Final Touches
Lastly, to add a little sparkle, you can add small edible decorations such as sprinkles, edible glitter, or tiny fondant accents around the mini cakes. This gives them a unique and festive look that ties the theme together.
By following these steps, you can easily create adorable mini Hello Kitty cakes or cupcakes that are fun, easy to serve, and perfect for any celebration
For a comprehensive guide on cake decorating techniques, consider exploring this Beginner’s Guide to Cake Decorating. It offers step-by-step instructions and valuable tips to enhance your skills
Common Mistakes to Avoid When Decorating a Hello Kitty Cake
Incorrect Fondant Handling: How to Avoid Cracks or Tears When Applying Fondant
Proper fondant handling is key to achieving a smooth, flawless cake design. Here’s how to avoid cracks or tears during the application process, step by step:
1. Knead the Fondant Well
First, before using fondant, knead it thoroughly until it becomes soft and pliable. This will prevent it from cracking when you roll it out. If the fondant is too stiff, add a small amount of shortening or a few drops of water to soften it.
2. Use Cornstarch or Powdered Sugar
Next, lightly dust your work surface with cornstarch or powdered sugar to prevent the fondant from sticking. Avoid overuse, as excess powder can cause cracks. You want just enough to keep the fondant from adhering to the surface.
3. Roll Out Evenly
After that, roll out the fondant evenly, ensuring it’s large enough to cover your cake. Roll it to a thickness of about 1/8 inch. If the fondant is too thin, it may tear during application; if it’s too thick, it may crack or create an uneven surface.
4. Use a Fondant Smooth Roller
Then, use a smooth rolling pin to roll out the fondant gently. If you notice any cracks forming as you roll, gently knead the area to soften it, and continue rolling to even out the surface. This ensures a smooth, pliable sheet of fondant.
5. Apply Fondant Slowly
When applying fondant, start at the top of your cake and work your way down. Gently drape the rolled fondant over the cake, making sure it covers the entire surface. If needed, smooth the fondant with your hands or a fondant smoother to eliminate any air bubbles or creases.
6. Smooth Out Wrinkles
Finally, once the fondant is on the cake, use a fondant smoother or your hands to smooth out any wrinkles or excess fondant. Start from the center and work your way out to prevent tearing or stretching.
By following these steps, you can avoid common fondant mistakes like cracking or tearing, ensuring a smooth, professional-looking Hello Kitty cake every time
Overuse of Decorations: How to Keep the Design Clean and Balanced
While decorations can enhance the overall look of your Hello Kitty cake, overusing them can make the design feel cluttered. Here’s how to maintain a clean and balanced design:
1. Focus on Key Elements
First, identify the key elements that define the Hello Kitty design, such as the face, bow, and whiskers. These should be the focal points of your cake. Avoid overcrowding with too many small or unnecessary decorations that might detract from the main features.
2. Use Negative Space
Next, leave some negative space on the cake. By allowing parts of the cake to remain undecorated, you can create a visually appealing balance. This space lets the main design stand out, making the cake look less cluttered.
3. Keep the Color Palette Simple
Then, choose a simple color palette. Stick to classic Hello Kitty colors like white, red, black, and yellow. Using too many different colors can overwhelm the design. Instead, let the colors that represent Hello Kitty shine by using subtle accents and minimal embellishments.
4. Limit the Number of Decorations
After that, limit the number of smaller decorations. While fondant flowers, hearts, or additional bows can be fun, use them sparingly. Instead, place them strategically to enhance the design, not overwhelm it.
5. Balance Decoration Placement
Finally, make sure the decorations are evenly distributed. If you add a bow to one side of the face, balance it with a small decorative element on the opposite side. This creates symmetry and harmony, ensuring the cake looks polished rather than over-decorated.
By following these steps, you can avoid overdecorating your Hello Kitty cake and keep the design clean, balanced, and visually appealing
Lack of Patience: Why It’s Important to Take Your Time with Each Step for the Best Results
Patience is key when decorating a Hello Kitty cake. Rushing through the process can lead to mistakes or a less polished final result. Here’s why taking your time matters:
1. Quality Over Speed
First, decorating a cake is an art. Taking your time allows you to focus on the finer details, ensuring each step is done with care. When you rush, it’s easy to overlook imperfections, resulting in a less professional finish.
2. Better Fondant Handling
Next, applying fondant smoothly requires patience. Rushing can lead to wrinkles, tears, or uneven coverage. By moving slowly and carefully, you can ensure that the fondant is applied evenly, creating a smooth, flawless surface for decoration.
3. Precision in Details
Then, small details like the eyes, nose, and whiskers need precision. Rushing through these steps can make them uneven or poorly placed. Taking your time with each feature ensures they’re symmetrical and add to the overall design.
4. Even Decoration Placement
Afterward, patience helps with the even placement of decorations. Whether it’s the bow or whiskers, rushing can cause them to be misplaced or uneven. By pausing and checking your work, you ensure everything is aligned and balanced.
5. Preventing Mistakes
Finally, moving too fast increases the chances of making mistakes that can’t be easily fixed. By being patient, you can catch mistakes before they happen and correct them, saving time and effort in the long run.
By taking your time through each step, you’ll achieve a more polished, professional-looking Hello Kitty cake that’s both beautiful and memorable
Not Using Proper Tools: The Impact of Using Improper Tools and Why Precision Is Key
Using the right tools is essential for creating a clean, precise, and professional-looking Hello Kitty cake. Here’s why proper tools matter and how they affect the quality of your design:
1. Fondant Smoothers for a Flawless Finish
First, a fondant smoother is crucial for achieving a smooth, even surface. Using your hands alone can cause wrinkles, air bubbles, or uneven spots. By using a fondant smoother, you ensure that the fondant adheres to the cake properly and remains smooth, providing a flawless base for decorating.
2. Piping Bags for Detail Work
Next, a piping bag is essential for creating fine details like whiskers, eyes, and the outline of Hello Kitty’s face. Without it, you might struggle to control the amount of icing or fondant applied, leading to uneven or messy lines. A well-fitted piping bag allows you to have better control and precision, especially for intricate details.
3. Rolling Pins for Consistent Thickness
After that, a rolling pin is necessary for rolling out fondant evenly. Without a rolling pin, fondant may become too thick in some areas and too thin in others, resulting in cracks or tears when applied. Using a rolling pin with guides ensures that the fondant is the right thickness for smooth application.
4. Sharp Knives and Scissors for Clean Cuts
Then, sharp knives and scissors are important for trimming and cutting fondant. Dull tools can cause jagged edges, while sharp tools provide clean, precise cuts. With a sharp knife or fondant cutter, you can easily trim fondant around the edges and cut small pieces for facial features, giving your Hello Kitty cake a polished, professional look.
5. Fondant Mold for Consistent Shapes
Finally, fondant molds are a great way to achieve uniform shapes for elements like bows, hearts, or flowers. Without molds, freehand shaping can lead to inconsistencies and uneven decorations. Using a mold ensures consistency, which is key to maintaining a professional look on your cake.
In conclusion, using the right tools enhances your ability to create precise, high-quality decorations and prevents mistakes. By investing in proper cake-decorating tools, you’ll have more control over your design, making the process easier and ensuring the best results for your Hello Kitty cake
Tips for Perfecting Your Hello Kitty Cake Every Time
Practice Makes Perfect: Why Practicing on a Dummy Cake Can Help You Perfect Your Technique
Practice is essential for mastering cake decorating skills. Using a dummy cake allows you to experiment without the pressure of making mistakes on a real cake. Here’s why practicing on a dummy cake is invaluable:
1. Perfecting Fondant Application
First, practicing on a dummy cake gives you the chance to perfect your fondant application technique. Rolling out and applying fondant smoothly can be tricky. By using a dummy cake, you can practice getting the right thickness, smoothness, and consistency without worrying about ruining the actual cake.
2. Improving Detail Work
Next, a dummy cake allows you to practice delicate detail work, like shaping Hello Kitty’s facial features or creating perfect bows. This is important because small details require a steady hand and precision. With a dummy cake, you can make mistakes, correct them, and improve your technique before working on the final cake.
3. Understanding Cake Structure
Then, working with a dummy cake helps you understand the structure and balance of your design. You can practice placing decorations evenly, ensuring that your design looks balanced and harmonious. This prevents issues like overcrowding on one side or uneven placement when working on the real cake.
4. Experimenting with Techniques
After that, practicing on a dummy cake gives you the freedom to experiment with different decorating techniques, like piping, stenciling, or airbrushing, without the risk of damaging your cake. It’s a great way to try new methods and find what works best for your Hello Kitty design.
5. Building Confidence
Finally, using a dummy cake builds your confidence in cake decorating. You’ll gain more experience, get comfortable with your tools, and improve your skill set. With practice, you’ll be able to execute your Hello Kitty cake design with more confidence and ease on the real cake.
In conclusion, practicing on a dummy cake is a great way to refine your techniques, make mistakes without consequences, and perfect your skills before decorating the final cake. It helps you build confidence and achieve a professional, polished result
Using Edible Cake Toppers: When to Use Ready-Made Hello Kitty Toppers for a Quicker, Yet Beautiful Design
Edible cake toppers can save time and still give your Hello Kitty cake a polished, professional look. Here’s when and why you might choose ready-made toppers for a quicker design:
1. Save Time on Intricate Details
First, creating detailed decorations like Hello Kitty’s face and accessories can be time-consuming. Using ready-made toppers allows you to skip this step, saving valuable time while still achieving an impressive design. This is especially useful if you’re on a tight schedule.
2. Consistent and High-Quality Design
Next, ready-made edible toppers are made with precision, ensuring that each piece is consistent and perfectly shaped. When you use these toppers, you don’t have to worry about uneven fondant shapes or poorly piped details. The toppers offer a flawless, uniform finish every time.
3. Ideal for Beginners
Then, if you’re new to cake decorating, ready-made toppers can be a great starting point. They allow you to create a beautiful Hello Kitty cake without the stress of intricate techniques. You can focus on mastering other parts of the design, like the cake base or additional decorations, while the topper takes care of the focal point.
4. Perfect for Large Orders or Events
After that, if you’re making multiple cakes or decorating for a large event, using ready-made toppers can speed up the process significantly. You can make several cakes in a short amount of time, maintaining quality and consistency across all of them. Toppers provide an easy way to decorate a large number of cakes without compromising on design.
5. Enhance Your Design with Minimal Effort
Finally, ready-made toppers can complement your design with minimal effort. You can combine the topper with simple decorative elements like piped frosting or fondant bows to create a balanced, yet visually striking Hello Kitty cake without overcomplicating the process.
In conclusion, using edible cake toppers is a great option when you want a quick, beautiful Hello Kitty design. It’s a practical solution for saving time, maintaining consistency, and achieving professional results, especially when you’re working within tight time constraints or are just starting out.
Storage and Transport: How to Store and Safely Transport Your Decorated Cake to Its Destination
Storing and transporting a decorated Hello Kitty cake requires special care to ensure it arrives at its destination in perfect condition. Here’s how to handle the cake carefully:
1. Allow the Cake to Set
First, before storing or transporting, allow your cake to set for at least an hour. This gives the fondant and decorations time to firm up, ensuring they stay in place during transport. If the cake is still soft or sticky, decorations might shift or smudge.
2. Choose the Right Storage
Next, use an airtight container or a cake box to store your decorated Hello Kitty cake. A sturdy cake box with high sides helps protect the decorations from getting damaged or bumped. If you don’t have a box, use a large container with a lid, ensuring it’s large enough to accommodate the cake without touching the sides.
3. Refrigeration Considerations
If your cake has perishable ingredients, such as buttercream or fresh fruit, refrigerate it before transport. However, avoid chilling the cake if it’s decorated with fondant, as the cold can cause it to sweat and lose its smooth finish. Instead, store it at room temperature if the weather permits, or refrigerate it just long enough before transport to ensure it stays fresh.
4. Secure the Cake for Transport
Then, to transport your Hello Kitty cake safely, make sure it’s secured. Place the cake on a flat surface, like a cake board, and ensure it doesn’t move inside the box. If necessary, use non-slip mats or bubble wrap around the cake to keep it stable. Avoid stacking other items on top of the cake during transport to prevent crushing the design.
5. Transport in a Stable Environment
Afterward, transport the cake in a cool, stable environment—preferably in a vehicle with air conditioning or temperature control. Ensure the cake remains upright and avoid sudden movements or sharp turns. If the cake is large, consider using a cake stand with a protective dome to shield it from any bumps along the way.
6. Final Touch-Ups Upon Arrival
Finally, once you arrive at the destination, check the cake to ensure everything is intact. If necessary, make minor touch-ups, like smoothing out any minor wrinkles or adding finishing details, especially if there’s been any slight shifting during transport.
In conclusion, storing and transporting a decorated Hello Kitty cake requires careful planning and handling. By following these steps, you can ensure that your cake reaches its destination looking as beautiful as it did when you finished decorating it
Incorporating Personalized Touches: How to Add the Birthday Person’s Name or Age with Edible Letters or Decorations
Personalizing a Hello Kitty cake with the birthday person’s name or age makes the cake even more special. Here’s how to add these personalized touches effectively:
1. Choosing the Right Placement
First, decide where to place the personalized touches on the cake. The best spots are often on the front or top, where they’ll be clearly visible. For example, you can place the name or age in the center of the cake, near the Hello Kitty face, or at the bottom in a decorative banner. Ensure it complements the overall design without overcrowding the space.
2. Using Edible Letters
Next, using edible letters is a simple yet effective way to personalize the cake. You can buy pre-made edible letter molds or make your own using fondant. Roll the fondant thinly, cut out the letters using letter cutters, and allow them to dry slightly before placing them on the cake. For a polished look, you can paint the letters with edible gold or silver paint or dust for a touch of elegance.
3. Piping Names or Numbers
If you prefer a more custom look, piping the name or age with royal icing or buttercream is another option. Fill a piping bag with your chosen icing, and use a fine round tip to pipe the letters neatly onto the cake. Practice first on parchment paper to ensure smooth, clean piping before applying to the cake.
4. Incorporating Decorative Elements
Then, add small decorative touches around the personalized text for a more cohesive design. For example, you can pipe small flowers, hearts, or stars around the name or age, or create a cute fondant bow to tie in with the Hello Kitty theme. These additions should match the overall color scheme to keep everything balanced.
5. Using Pre-Made Personalized Toppers
Afterward, if you’re short on time or want a quicker option, consider using pre-made personalized cake toppers. These can include edible images with the birthday person’s name or age, or even pre-printed fondant sheets with custom text. Place the topper gently on the cake, and it will add an instant personalized flair without extra effort.
6. Final Touches for Consistency
Finally, ensure that the personalized elements are in line with the overall theme. For example, if you’re using a bold color scheme, match the name and age with the same color palette to keep the design cohesive. Add finishing touches, like a dusting of edible glitter or a small fondant decoration, to complete the look.
In conclusion, incorporating personalized touches on a Hello Kitty cake, such as adding the birthday person’s name or age, is a fun way to make the cake even more memorable. Whether you use edible letters, piping, or pre-made toppers, these steps will help you create a personalized, beautiful cake that stands out
Conclusion
To sum up, here are the key tips for decorating a beautiful Hello Kitty cake:
- Pick your cake base: Choose a simple cake like vanilla or chocolate.
- Use fondant: Smooth fondant for Hello Kitty’s face and features.
- Buttercream frosting: Add it for detailed accents and a smooth finish.
- Essential tools: Invest in piping bags, fondant smoothers, and other must-haves.
- Personalize your cake: Add the birthday person’s name or age for a special touch.
- Store and transport: Ensure your cake stays intact during travel.
Experiment with different design ideas and have fun with the process. Whether it’s classic or themed, the possibilities are endless!
We’d love to see your Hello Kitty cake creations! Share them on social media and tag us. Plus, check out our other cake decorating tutorials to keep perfecting your skills. Happy decorating