
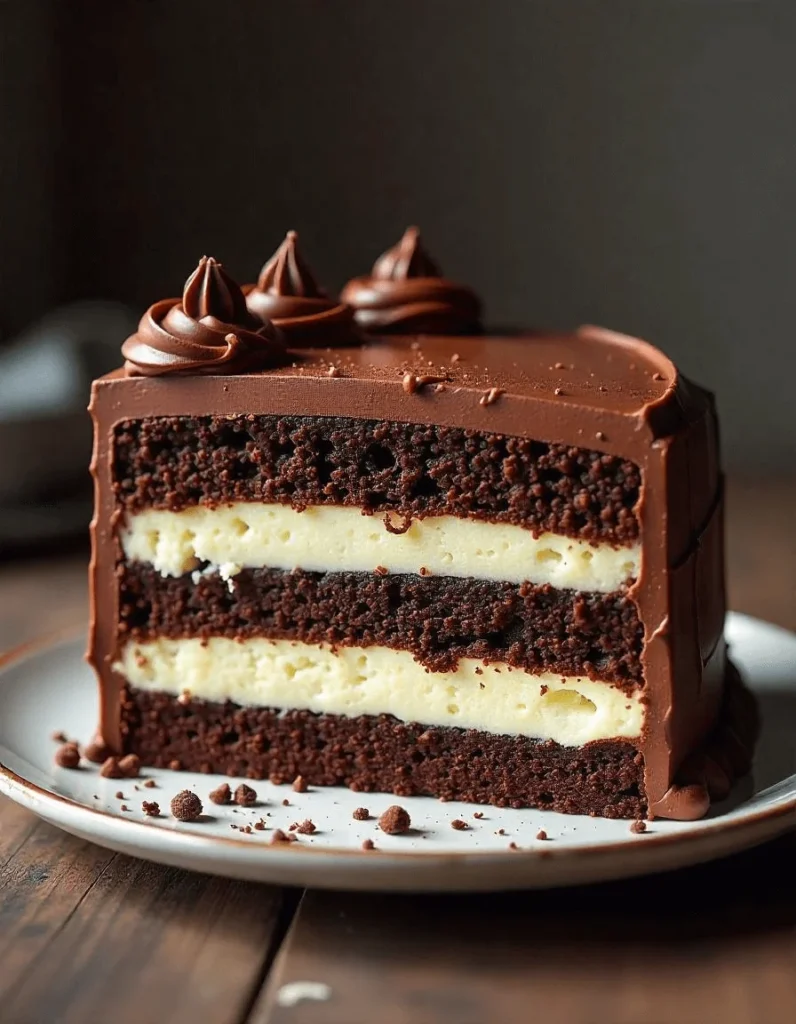
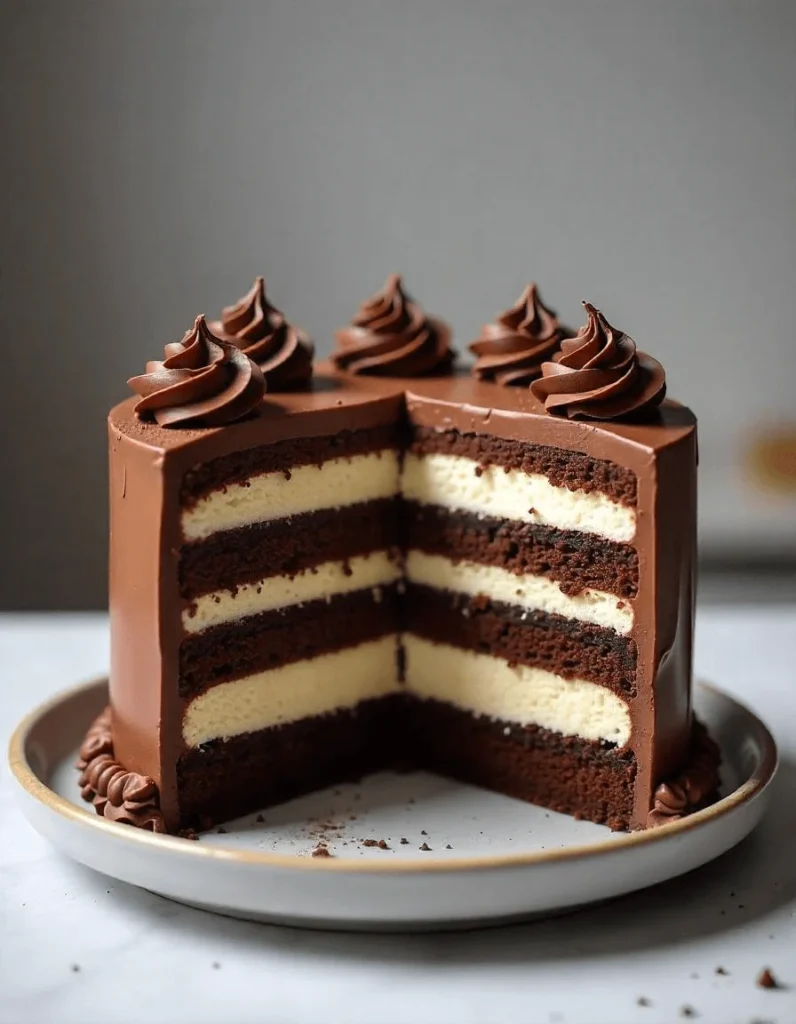
Zebra cakes are a fun and delicious dessert. They combine the rich flavors of chocolate and vanilla in a striking striped pattern. This dessert is easy to make and perfect for any occasion. Whether you’re an experienced baker or a beginner, zebra cakes are sure to impress. The light, fluffy texture and creamy frosting make them irresistible. In this blog post, we’ll show you how to make the best zebra cakes with simple, easy-to-follow recipes. Get ready to indulge in a treat that everyone will love
What Are Zebra Cakes? A Delicious Twist on a Classic Cake
Definition of Zebra Cakes and How They Differ from Traditional Cakes
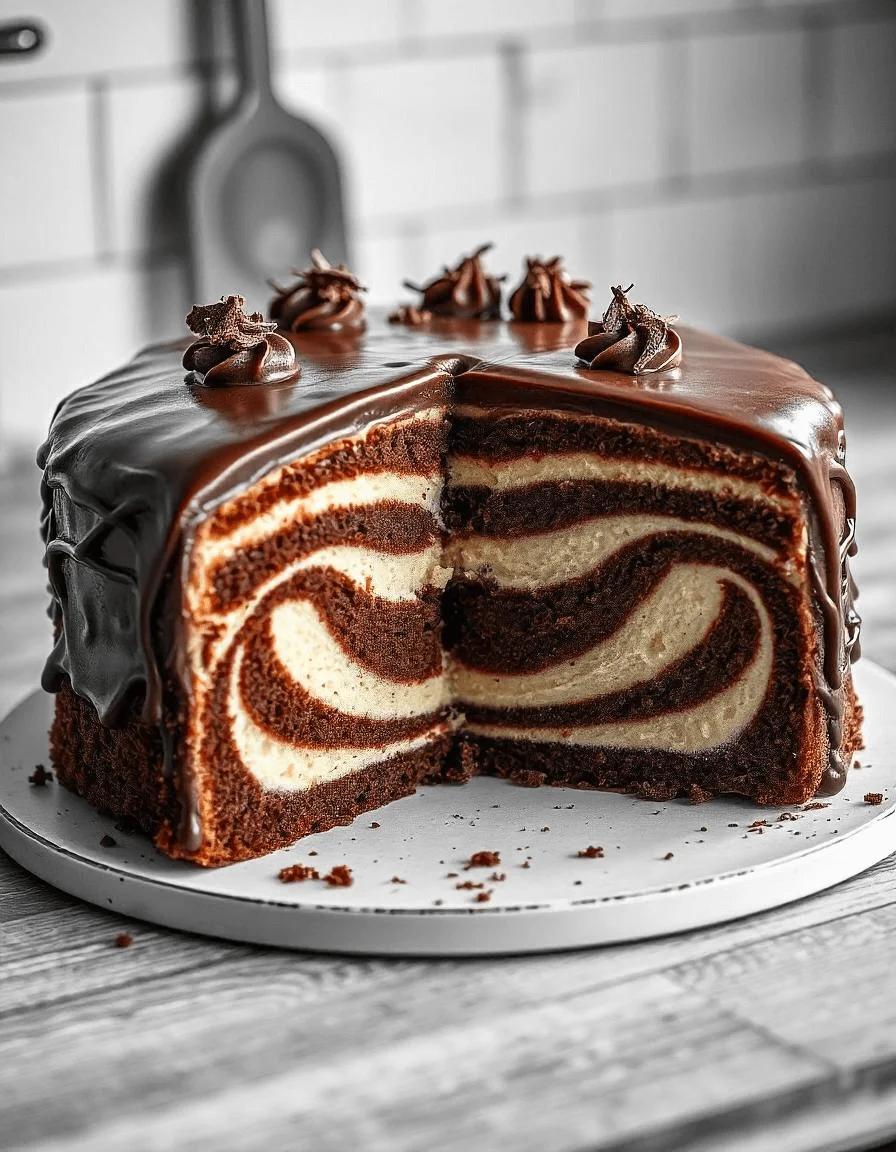
Zebra cakes are a unique dessert known for their visually striking appearance. Bakers create them by layering chocolate and vanilla batter, forming a bold striped pattern when baked. The key to achieving this look is pouring the batters in a way that allows them to spread evenly while retaining their separate colors.
- Layering the Batter: Unlike traditional cakes, which often use a single flavor, zebra cakes feature two distinct batters—chocolate and vanilla. Bakers spoon the batters into the center of the cake pan, alternating them to create the signature stripes.
- Texture and Flavor: Traditional cakes typically feature one flavor, but zebra cakes offer a blend of two flavors in every bite. The vanilla layer brings a light, fluffy taste, while the chocolate layer adds richness and depth. This contrast makes zebra cakes more exciting than a basic cake.
- Visual Appeal: The stripes in zebra cakes make them stand out more than traditional cakes. Whether served at a birthday party or a family gathering, their unique design always catches the eye and impresses guests. The alternating layers create a playful, sophisticated dessert perfect for any occasion.
- Frosting and Decoration: Like traditional cakes, zebra cakes can be decorated with frosting. However, bakers often emphasize the frosting to enhance the contrast of the stripes. Some choose simple frosting, while others add extra decorations, such as sprinkles or edible glitter, to elevate the look.
Key Ingredients (Chocolate, Vanilla) and Their Importance
Zebra cakes are a delicious treat that relies on the perfect combination of chocolate and vanilla. These two ingredients are crucial not only for the flavor but also for the cake’s visual appeal and texture. Let’s break down how each one plays an essential role in creating the perfect zebra cake.
1. Vanilla: The Foundation Flavor
Vanilla is the base of the zebra cake, providing a light and sweet flavor that contrasts beautifully with the richness of chocolate. The vanilla batter typically includes ingredients like flour, sugar, eggs, and vanilla extract. This combination helps the cake achieve a soft, moist texture. Without vanilla, the zebra cake would lack the delicate sweetness that complements the deeper flavors of chocolate.
2. Chocolate: Adding Richness and Depth
Chocolate plays a key role in giving zebra cakes their bold and flavorful contrast. Typically made with cocoa powder or melted chocolate, the chocolate batter introduces a rich, deep taste that gives the cake its signature dark color. This darker color creates the eye-catching zebra stripes while providing a satisfying and full-bodied flavor in every bite. The chocolate balances the sweetness of the vanilla and elevates the overall flavor profile.
3. The Balance of Flavors
The magic of zebra cakes comes from the balance between vanilla and chocolate. While vanilla offers a light, airy flavor, chocolate adds depth and richness. The two complement each other perfectly, making zebra cakes more exciting than a traditional single-flavor cake. This balance ensures that every bite delivers both a sweet and rich flavor, creating a more complex and satisfying dessert.
4. Consistency: The Key to Perfect Stripes
For zebra cakes to maintain their iconic striped pattern, both the vanilla and chocolate batters need to have a similar consistency. If one batter is too thick or too thin, the layers may mix together, ruining the striped effect. Achieving the right texture for both batters ensures they stay distinct and form even layers, giving you those beautiful zebra stripes with a smooth, consistent texture
Brief History or Origin of Zebra Cakes
Zebra cakes, with their distinct striped appearance, have become a beloved snack treat, but their origin is rooted in classic cake-making traditions. While zebra cakes as we know them are a modern invention, the concept of layered or striped cakes dates back centuries.
1. Early Cake Innovations
The concept of alternating layers of different colored batters, like the ones seen in zebra cakes, can be traced back to European baking traditions. Many early cake recipes experimented with color and texture, often using ingredients like cocoa and vanilla to create contrasting flavors and layers.
2. The Rise of Pre-packaged Zebra Cakes
Zebra cakes, in their modern form, became widely popular as a packaged snack cake in the United States in the late 20th century. They were first introduced by Little Debbie, an iconic American brand known for its variety of snack cakes. Their zebra cakes featured two swirled layers—chocolate and vanilla—and were often frosted with a sweet glaze, making them visually appealing as well as delicious.
3. Modern-Day Popularity
Over the years, zebra cakes have become a staple in American households, particularly as a lunchbox snack or dessert. The combination of simplicity, eye-catching appearance, and irresistible flavor continues to keep zebra cakes a favorite among children and adults alike. Today, various brands and even home bakers have put their spin on the classic, introducing new flavors and formats while keeping the essential striped design.
Mention the Entity “Layer Cake” and Why It’s Perfect for This Recipe
Layer cakes are a beloved tradition in the baking world, and they play a crucial role in the success of zebra cakes. Let’s break down why the concept of a layer cake is so well-suited for creating this striking dessert.
1. Layer Cakes: A Classic Technique
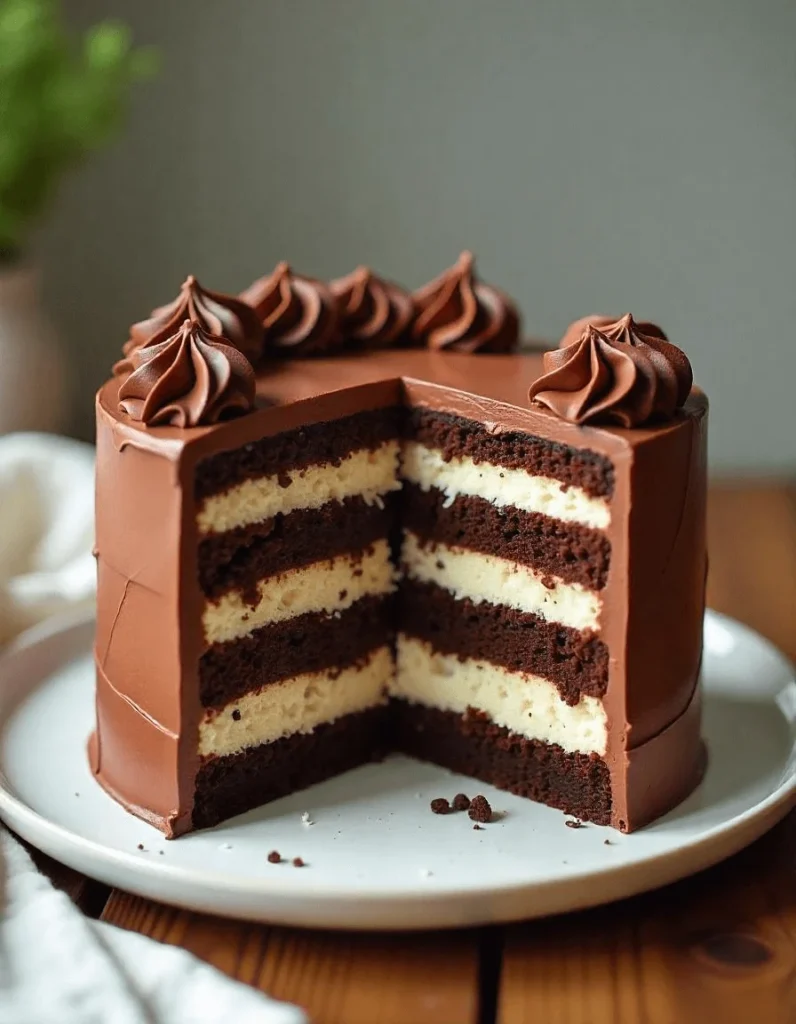
Layer cakes, as the name suggests, involve stacking multiple layers of cake, often with filling or frosting between them. This method is popular for achieving visually appealing desserts with contrasting textures and flavors. It allows for creativity, as bakers can alternate between different batters, such as chocolate and vanilla, just like in zebra cakes.
2. The Role of Layers in Zebra Cakes
Zebra cakes use the layer cake technique but with a twist: instead of stacking separate layers, the batters are swirled together to create a striped pattern. The alternating layers of vanilla and chocolate give the zebra cake its signature look. The cake’s texture also benefits from the layering technique, offering a satisfying bite with a balance of soft, fluffy vanilla and rich, dense chocolate.
3. Why Layer Cake Works for Zebra Cakes
Layer cakes are perfect for zebra cakes because they allow for the striking contrast between light and dark batters, which is key to the zebra pattern. The layering process also ensures that the cake has a uniform, consistent texture. The swirls created by alternating batters make zebra cakes visually dynamic, and the technique helps achieve the perfect balance of flavors in every bite
How to Make Easy and Irresistible Zebra Cakes at Home
Step-by-Step Instructions on Making Zebra Cakes from Scratch
Making zebra cakes from scratch is an enjoyable and creative process. Follow these steps carefully to achieve the perfect striped pattern and delicious taste.
1. Gather and Prepare Ingredients
Before you start, make sure all your ingredients are ready. You’ll need:
- For the batter: Flour, sugar, eggs, butter, milk, vanilla extract, cocoa powder, and baking powder.
- For the glaze or frosting: Powdered sugar, milk, and vanilla extract.
Taking time to measure your ingredients properly will make the entire process much easier.
2. Prepare the Vanilla and Chocolate Batters
To create the perfect zebra stripes, you need two distinct batters.
- Make the Vanilla Batter:
- First, cream butter and sugar until the mixture is light and fluffy.
- Then, beat in the eggs one at a time, ensuring each one is fully incorporated.
- After that, mix in the vanilla extract.
- Finally, alternate adding the flour, baking powder, and milk, blending until the batter is smooth.
- Prepare the Chocolate Batter:
- Take half of the vanilla batter and carefully stir in the cocoa powder.
- Mix until the chocolate batter is evenly blended and matches the consistency of the vanilla batter.
3. Create the Iconic Zebra Stripes
Now it’s time to form the beautiful striped pattern:
- Preheat your oven to 350°F (175°C) and grease a round cake pan.
- Spoon one ladle of vanilla batter into the center of the pan.
- Add one ladle of chocolate batter directly on top of the vanilla.
- Repeat these steps, alternating between the two batters, until you’ve used up all the batter.
As the batters spread naturally, the zebra pattern will start to take shape.
4. Bake to Perfection
After layering the batter:
- Place the pan in the preheated oven and bake for about 30–35 minutes.
- To check if the cake is done, insert a toothpick into the center—it should come out clean.
- Once baked, let the cake cool in the pan for 10 minutes, then transfer it to a wire rack to cool completely.
5. Add the Final Touches
Finally, finish your zebra cake with a glaze or frosting:
- Prepare the Glaze:
- Mix powdered sugar with a small amount of milk and vanilla extract until smooth.
- Apply the Glaze:
- Drizzle the glaze over the cooled cake for a simple, elegant finish, or frost it if you prefer a richer dessert.
6. Serve and Enjoy
Once the glaze has set, slice the cake to reveal its stunning stripes. Serve it to your friends and family, and enjoy every bite of your homemade zebra cake
Tips for Achieving the Perfect Zebra Stripes in the Cake
Creating the iconic zebra stripes in a cake requires attention to detail and careful technique. Follow these practical tips step-by-step to ensure your cake looks as good as it tastes.
1. Use Batters of Equal Consistency
The most important factor in achieving clean stripes is ensuring both the vanilla and chocolate batters have a similar thickness. If one batter is too thick or runny, the layers will not form properly, causing the stripes to blur or mix together. Adjust the consistency by adding a small amount of milk to thicken or thin the batter as needed.
2. Alternate Batters Centrally
To create uniform stripes:
- Start with a ladle of vanilla batter and pour it into the center of the cake pan.
- Follow with a ladle of chocolate batter directly in the middle of the vanilla layer.
- Repeat this process, always pouring each batter into the center, allowing it to spread naturally outward.
This alternating method ensures concentric layers that form the classic zebra pattern.
3. Keep the Pouring Steady and Controlled
When adding each layer, pour the batter slowly and steadily. Avoid tilting or shaking the pan, as this can disrupt the layers and ruin the pattern. Take your time to ensure the batter spreads evenly and naturally forms rings.
4. Choose the Right Pan Size
Using a round cake pan of appropriate size (8 or 9 inches) helps the batter spread evenly and creates the ideal stripe proportions. A smaller pan may cause overcrowding, while a larger pan might make the stripes too thin.
5. Avoid Overmixing
When combining ingredients for both batters, mix just until smooth. Overmixing can cause the batter to become dense, making it harder to layer properly. A light, airy batter spreads more easily and creates distinct layers.
6. Test and Adjust
If it’s your first attempt at zebra cakes, try a practice batch using a smaller portion of batter. This allows you to refine your pouring technique and ensure the stripes form perfectly before making a full-sized cake.
By following these tips, you’ll achieve a stunning zebra-striped cake that’s not only visually appealing but also deliciously satisfying. Let the stripes shine as a testament to your baking precision!
Zebra Cake Frosting: Tips for Decorating
The right frosting can elevate your zebra cake, both in flavor and appearance. Decorating a zebra cake involves creativity and attention to detail to highlight its iconic striped pattern. Here are some valuable tips for frosting and decorating your zebra cake step by step:
1. Choose the Right Frosting
Selecting the ideal frosting is the first step:
- Buttercream Frosting: A classic option, buttercream is easy to spread and can be flavored with vanilla or chocolate to complement the cake’s layers.
- Cream Cheese Frosting: For a tangy twist, cream cheese frosting pairs beautifully with the rich chocolate and sweet vanilla flavors.
- Ganache: A silky chocolate ganache adds a luxurious touch, enhancing both the flavor and visual appeal.
Choose a frosting that suits your taste and matches the occasion.
2. Prepare the Cake for Frosting
To achieve a smooth and professional look:
- Cool the Cake Completely: Ensure the cake has cooled fully before applying frosting. A warm cake can cause the frosting to melt and slide off.
- Crumb Coat: Apply a thin layer of frosting as a base coat to trap crumbs. Chill the cake for 15–30 minutes before adding the final layer.
3. Highlight the Zebra Stripes
Emphasize the striped theme in your decoration:
- Use contrasting colors, such as white frosting with chocolate drizzle, to mimic the zebra pattern.
- Pipe alternating stripes of chocolate and vanilla frosting around the sides for a dramatic effect.
4. Add Decorative Touches
Take your zebra cake to the next level with creative decorations:
- Chocolate Shavings or Curls: Sprinkle chocolate shavings over the top for a sophisticated finish.
- Drizzled Patterns: Use melted chocolate to drizzle zebra-like patterns across the top of the cake.
- Piping: Decorate with piped rosettes or swirls around the edges for added elegance.
5. Keep it Simple for a Modern Look
For a minimalist approach, frost the cake with a smooth layer of ganache or buttercream. The simplicity lets the zebra pattern inside the cake shine as the star of the show.
6. Use Edible Accessories
Incorporate edible decorations to add a playful or elegant touch:
- Add a dusting of edible glitter for a glamorous look.
- Use chocolate chips or fondant shapes to create animal-print designs on the frosting.
- Place edible flowers or fruit slices for a fresh and colorful contrast.
7. Serve with Style
Finally, present your zebra cake on a cake stand or decorative plate to enhance its visual appeal. Slice carefully to reveal the stripes and allow the frosting to complement the bold interior pattern.
By following these frosting and decorating tips, your zebra cake will not only taste delicious but also become a stunning centerpiece for any occasion!
Easy Zebra Cakes: Emphasizing Simplicity
Zebra cakes are simple to make with just a few ingredients and basic techniques. Here’s how their simplicity shines through:
Minimal Ingredients, Maximum Impact
Made with pantry staples like flour, sugar, eggs, cocoa powder, and vanilla extract, zebra cakes are both easy and affordable to prepare.
Straightforward Preparation Steps
Mix two batters—one vanilla, one chocolate—from the same base recipe. Layer them alternately in a cake pan to form the iconic striped pattern during baking.
No Advanced Equipment Required
All you need are basic tools like a whisk, mixing bowls, and a round cake pan—perfect for home bakers of any skill level.
Quick Baking and Frosting Options
Bake the cake quickly and add a simple frosting: powdered sugar or a chocolate glaze for a polished look.
Fun for All Ages
Making zebra cakes is a great family activity—kids can help layer the batter and watch the stripes form as the cake bakes.
Customizable to Your Preferences
Feel free to add flavors like citrus zest to the vanilla batter or experiment with different extracts in the chocolate batter.
Zebra cakes are an easy and fun dessert for anyone, offering both simplicity and style!
This version is much shorter and to the point. Let me know if you’d like to refine it further!
Tips for Perfect Zebra Cake Layers Every Time
Ensuring Consistent Layers of Vanilla and Chocolate Cake
Achieving even, consistent layers of vanilla and chocolate in your zebra cake is key to getting those striking stripes. Here’s how to ensure perfect results:
1. Prepare the Batter Consistently
To achieve even layers, both the vanilla and chocolate batters should have similar thickness. If one batter is too runny or too thick, the layers may blend together, ruining the striped effect.
- Tip: If the batter seems too thin, simply add a bit more flour to the vanilla or chocolate mixture until it thickens to a similar consistency.
2. Use a Spoon for Even Scoops
When layering the batters, use a spoon to drop alternating dollops of vanilla and chocolate batter into the center of the pan.
- Tip: Place each new scoop in the middle of the previous one, which will spread out naturally and form an even layer.
3. Control the Size of Each Scoop
Ensure that each scoop of batter is roughly the same size. This will help maintain a balance between the two batters, ensuring uniform layers.
- Tip: You can use an ice cream scoop or a large tablespoon for consistent portions.
4. Avoid Overmixing the Batters
After preparing both batters, avoid overmixing. Overmixing can affect the texture and consistency, making it harder to achieve clear layers.
- Tip: Stir just enough to combine the ingredients, keeping the batters smooth but not overworked.
5. Bake Immediately
Once the batter is layered, bake the cake right away. Letting the layers sit too long before baking can cause them to sink or mix.
- Tip: Preheat the oven beforehand, so your cake goes into a hot oven immediately after prepping the batter.
By following these steps, you can achieve beautifully defined layers of vanilla and chocolate in your zebra cake, ensuring a stunning and delicious dessert every time.
This version includes more transition words to improve readability and flow. Let me know if you need further adjustments
How to Make Your Zebra Cake Soft and Moist
To achieve a soft and moist zebra cake, it’s essential to follow a few key steps during preparation and baking. Here’s how you can ensure your cake is both tender and flavorful:
1. Use Room Temperature Ingredients
Using room temperature ingredients, such as eggs, milk, and butter, helps the batter mix evenly and trap air. This results in a lighter and fluffier texture.
- Tip: Take out the eggs and butter 30 minutes before baking to bring them to room temperature.
2. Don’t Overmix the Batter
When combining the dry and wet ingredients, avoid overmixing the batter. Overmixing can lead to dense cake. Instead, mix until just combined to maintain airiness.
- Tip: Mix the ingredients until there are no dry patches, but stop once the batter is smooth.
3. Add Sour Cream or Yogurt
Incorporating sour cream or yogurt into the batter adds moisture and richness, giving the cake a soft and moist texture.
- Tip: Substitute a portion of the milk with sour cream or yogurt for extra moisture.
4. Don’t Overbake the Cake
Baking the cake for too long can dry it out. Keep an eye on the baking time and use a toothpick to check for doneness. The cake is ready when the toothpick comes out clean.
- Tip: Start checking your cake 5 minutes before the recommended baking time ends to prevent overbaking.
5. Use Cake Flour
Cake flour has a lower protein content, which helps the cake stay light and tender. This is especially important for achieving a soft and moist texture.
- Tip: If you don’t have cake flour, you can substitute it with all-purpose flour by removing 2 tablespoons per cup and replacing it with cornstarch.
By following these steps, you can ensure that your zebra cake turns out soft, moist, and fluffy with the perfect texture in every bite
Importance of Cake Pan Preparation and Baking Temperature
Proper cake pan preparation and correct baking temperature are key to achieving a perfectly baked zebra cake. Here’s how each element contributes to your cake’s success:
1. Greasing and Flourishing the Pan
Before adding any batter, it’s essential to properly prepare your cake pan. Grease the sides and bottom of the pan with butter or oil, then dust it with flour. This helps the cake release easily after baking, preventing any sticking.
- Tip: For extra assurance, you can line the bottom of the pan with parchment paper.
2. Use the Right Size Pan
Choosing the correct pan size is crucial for the cake’s structure and cooking time. A pan that’s too small can cause the batter to overflow, while a pan that’s too large may make the cake too thin.
- Tip: Follow your recipe’s recommendations for pan size to ensure your cake rises evenly and cooks properly.
3. Preheat the Oven
Always preheat the oven before placing your cake inside. A hot oven ensures even baking from the start, which helps the cake rise uniformly.
- Tip: Preheat the oven at least 10–15 minutes before baking to make sure it reaches the correct temperature.
4. Maintain Consistent Baking Temperature
Baking at the correct temperature ensures that your cake cooks evenly. If the oven is too hot, the outside of the cake will brown too quickly, while the inside remains raw. Conversely, baking at too low a temperature can result in a dense, undercooked cake.
- Tip: Use an oven thermometer to ensure your oven is at the correct temperature. A typical baking temperature for zebra cakes is around 350°F (175°C).
5. Don’t Open the Oven Door Too Soon
Opening the oven door too early can cause the cake to collapse or cook unevenly. Only open the door when it’s time to check for doneness.
- Tip: Wait until the recommended baking time has passed before checking the cake’s progress.
By preparing your cake pan properly and ensuring the correct baking temperature, you set the foundation for a perfectly baked zebra cake with the right texture and appearance
How to Troubleshoot Common Mistakes in Zebra Cake Layers
Achieving the perfect zebra cake with well-defined layers can sometimes be tricky. If you’re facing challenges with the layers, here’s how to troubleshoot and fix common issues:
1. Layers Are Mixing Together
If your zebra cake layers are blending rather than staying distinct, it’s usually a sign that the batter consistency isn’t right.
- Solution: Make sure both the vanilla and chocolate batters are of similar thickness. If one batter is too thin, it will spread too much and mix with the other. Consider adding a little more flour to thicken the thinner batter.
2. Uneven Layers
Sometimes the zebra stripes may be uneven, with one layer thicker than the other.
- Solution: Pour the batter carefully, alternating small amounts of vanilla and chocolate in the center of the pan. As you add each layer, let it naturally spread outward. You can also use a spoon or a piping bag for better control.
3. Stripes Are Not Defined
If the zebra stripes aren’t visible or crisp, the layers may have merged during baking.
- Solution: Avoid overmixing the batter or disturbing the layers too much. Additionally, make sure your oven temperature is consistent, as baking at a temperature that’s too high or low can affect how the layers set.
4. Cake is Dense or Dry
A dense or dry zebra cake is often a result of overmixing the batter, overbaking, or not using enough moisture in the recipe.
- Solution: Mix the batter gently until just combined, and be sure to check the cake for doneness before the recommended baking time ends. If it’s still dry, try adding a bit of sour cream or yogurt to the batter for more moisture.
5. Cake Layers Are Too Thick
If your zebra cake layers are too thick and the cake is undercooked in the middle, this could be because too much batter was added at once.
- Solution: Pour thin layers of batter for better control and even baking. You can also try baking at a slightly lower temperature to ensure the cake cooks through without the layers being too thick.
By following these troubleshooting tips, you can overcome common zebra cake issues and achieve the perfect striped layers for a beautifully baked cake
Decorating Your Zebra Cakes: Fun and Creative Ideas
Creative Ways to Decorate Zebra Cakes with Frosting
Decorating your zebra cake with frosting adds a beautiful touch and enhances its flavor. Here are some creative ways to make your zebra cake stand out with frosting:
1. Simple Swirls for a Classic Look
A classic and elegant way to decorate your zebra cake is by creating simple swirls of frosting.
- How to do it: Use a piping bag fitted with a star or round tip. Start at the outer edge of the cake and work your way in, creating circular swirls that overlap slightly. This design works well for a more sophisticated look.
2. Zebra Stripes on Top
To emphasize the zebra pattern, you can use contrasting colored frosting for the top.
- How to do it: Pipe alternating lines of black and white frosting (or chocolate and vanilla) on top of the cake. Use a toothpick or skewer to drag through the lines to create a zebra stripe effect. This brings out the iconic look of the cake and adds a fun visual element.
3. Frosting Borders for a Defined Finish
Create clean, defined borders with frosting to frame the zebra stripes and make the cake look polished.
- How to do it: Pipe a decorative border around the edges of the cake using a piping tip. You can use a scalloped pattern for a more ornate look, or a smooth, clean line for a simple finish.
4. Drip Frosting for a Modern Twist
For a more trendy look, use drip frosting to add a modern flair to your zebra cake.
- How to do it: Make a thin glaze (chocolate ganache or colored frosting) and drizzle it over the top of the cake, allowing it to drip down the sides. This creates a beautiful, messy effect that contrasts with the clean zebra stripes.
5. Fun Animal Print Accents
To further embrace the zebra theme, add animal print accents on the cake.
- How to do it: Once your zebra stripes are complete, you can use a small round piping tip to pipe small dots or lines around the cake to mimic a more intricate animal print design. You can use edible glitter or gold dust to give it a touch of glamour.
By using these creative frosting techniques, you can turn your zebra cake into a masterpiece that’s not only delicious but visually stunning as well!
Using Different Colored Frostings or Toppings for Added Flair
Adding colorful frostings or toppings to your zebra cake can elevate its visual appeal and make it even more festive. Here are some creative ideas to incorporate color and flair into your zebra cake decoration:
1. Use Brightly Colored Frostings for a Fun Twist
Incorporating vibrant colored frostings alongside the classic black and white zebra stripes adds a fun and playful touch to your cake.
- How to do it: Divide your frosting into separate bowls and color each batch with food coloring. You can use pastels for a soft look or bold colors like red, blue, or pink for a striking effect. Pipe or spread the colored frosting onto the cake in a fun pattern, such as geometric shapes or alternating stripes.
2. Top with Colorful Sprinkles for Extra Texture
Sprinkles are an easy and effective way to add both color and texture to your zebra cake.
- How to do it: After frosting the cake, scatter colorful sprinkles on top, or pipe them along the sides of the cake. Choose from a variety of sprinkles such as rainbow, chocolate, or metallics to match your theme.
3. Edible Flowers for a Fresh, Elegant Look
For a more elegant and natural flair, edible flowers can complement the bold zebra stripes.
- How to do it: Carefully place edible flowers like pansies, violets, or roses on top of the cake, either in the center or along the edges. The vibrant colors of the flowers create a beautiful contrast with the black-and-white stripes.
4. Chocolate Shavings or Chips for Texture and Depth
Incorporating chocolate shavings or chips on top of your zebra cake adds both flavor and texture.
- How to do it: After frosting your cake, sprinkle finely grated chocolate or chocolate chips over the top. This adds a layer of richness to the cake and complements the chocolate batter in the zebra stripes.
5. Drizzle with Colored Glaze for a Bold Look
Using a colored glaze (such as strawberry or lemon) can provide a unique touch to your zebra cake.
- How to do it: Mix powdered sugar with a few drops of food coloring and a small amount of milk to create a glaze. Drizzle it over the cake in a zigzag or spiral pattern, allowing it to drip down the sides. This creates an eye-catching, glossy finish.
By experimenting with different colored frostings and toppings, you can add personality and flair to your zebra cake, making it the perfect showstopper for any occasion
How to Make a Zebra Cake Suitable for Birthdays or Special Occasions
Making a zebra cake suitable for birthdays or special occasions requires some creativity in both flavor and presentation. Here’s how to transform your zebra cake into the perfect celebration dessert:
1. Customize the Design with Fun Themes
Make your zebra cake more exciting by customizing it with a theme that suits the occasion.
- How to do it: Use food coloring to create themed patterns, such as adding pastel stripes for a baby shower or vibrant rainbow colors for a child’s birthday. You can also top the cake with themed toppers like candles, mini figurines, or custom birthday messages written in frosting.
2. Add a Special Touch with Edible Glitter or Gold Dust
Edible glitter or gold dust can elevate the look of your zebra cake, giving it a touch of elegance.
- How to do it: After decorating the cake with frosting, lightly dust it with edible glitter or gold dust. This will create a sparkling effect, perfect for weddings, anniversaries, or any special event that needs a bit of glamour.
3. Use Fondant for a Smooth, Sleek Finish
Fondant can help achieve a flawless, polished look for your zebra cake, making it perfect for upscale celebrations.
- How to do it: Roll out fondant and drape it over the cake for a smooth and shiny finish. You can cut fondant into shapes like flowers, bows, or stars to match the event’s theme and place them on top of the cake for added flair.
4. Create a Multi-Tiered Cake for Larger Gatherings
For larger events, consider making a multi-tiered zebra cake to serve more guests while keeping the striking design.
- How to do it: Bake several smaller cakes and stack them with frosting in between each layer. Decorate each tier with the same zebra stripe pattern and ensure the top tier stands out with extra decoration like flowers, candles, or a special message.
5. Incorporate Flavor Variations for a Unique Twist
To make the zebra cake even more personalized for birthdays or special occasions, experiment with different flavors.
- How to do it: In addition to the classic vanilla and chocolate batter, try adding flavors like raspberry, lemon, or coconut. You can swirl these flavors into the zebra stripes for a delicious, unique twist.
By using these tips, you can turn your zebra cake into the star of the show, whether it’s a birthday, wedding, or any other special celebration
Incorporate the Entity “Birthday Cake” to Target Celebratory Events
To make your zebra cake perfect for a birthday celebration, adding elements that enhance its suitability as a birthday cake can make it even more special. Here’s how to incorporate the classic “birthday cake” vibe while keeping the distinctive zebra stripes:
1. Personalize with a Birthday Message
A simple way to turn your zebra cake into a birthday cake is by adding a personalized message for the birthday person.
- How to do it: Use frosting or edible markers to write a message like “Happy Birthday” or the birthday person’s name. You can also pipe the message with contrasting colors to make it pop against the zebra stripes.
2. Top with Candles
Birthday cakes are synonymous with candles, and this is an easy way to elevate your zebra cake for the occasion.
- How to do it: Add a set of candles to the top of the cake, either placed in the center or arranged around a birthday topper. You can use traditional birthday candles or opt for sparkler candles to make the moment even more memorable.
3. Use Birthday-Themed Decorations
Adding festive decorations can make your zebra cake stand out as the perfect birthday cake.
- How to do it: Decorate the cake with birthday-themed toppers like small figurines, balloons, or edible glitter. You can also add colorful sprinkles or confetti to give it a fun and celebratory feel.
4. Serve with a Layer of Sweet Frosting
A birthday cake often has a generous layer of frosting, which you can add to your zebra cake to make it even more indulgent.
- How to do it: Choose a frosting that complements the zebra stripes, such as buttercream, cream cheese, or chocolate ganache. Ensure the frosting is thick enough to hold up any decorations you may add, like sprinkles or birthday candles.
5. Make It a Multi-Layer Cake
For a more dramatic birthday cake presentation, consider making your zebra cake a multi-layer cake to impress guests.
- How to do it: Bake multiple layers of zebra cake and stack them with frosting in between each layer. Each layer should maintain the zebra pattern, and you can add colorful decorations on top to reflect the festive nature of the birthday celebration.
By incorporating these elements, your zebra cake will not only have its signature black-and-white stripes but will also be transformed into a delightful birthday cake that’s perfect for celebrating
If you’re also interested in fun and creative cake decorating ideas, check out our Hello Kitty cake decorating tips for inspiration on how to make your cakes even more delightful.
Serving and Storing Zebra Cakes: How to Keep Them Fresh
Best Ways to Serve Zebra Cakes for Different Occasions
Zebra cakes can be served in various ways depending on the occasion, making them a versatile dessert that can fit into any celebration. Here’s how you can serve zebra cakes for different events:
1. For Birthday Parties:
At birthday parties, zebra cakes can be served as the centerpiece or as individual slices to guests.
- How to do it: If serving as a centerpiece, slice the zebra cake into wedges and decorate each slice with colorful sprinkles or birthday-themed toppers. For smaller parties, individual mini zebra cakes are a fun and easy way to serve the cake to each guest, ensuring everyone gets a sweet piece to enjoy.
2. For Weddings:
Zebra cakes can be adapted into a more elegant dessert for weddings with a few special touches.
- How to do it: Consider creating a multi-tiered zebra cake to serve at a wedding. Each tier can be decorated with intricate piping, edible flowers, or fondant accents. Serve the cake with a glass of champagne or pairing it with a delicate dessert table that includes other wedding treats.
3. For Baby Showers:
At a baby shower, zebra cakes can take on a softer, pastel look to match the occasion’s theme.
- How to do it: Swirl pastel-colored frosting into the zebra stripes and top the cake with baby shower-themed decorations, such as baby booties, pacifiers, or soft flowers. Serve the cake in small portions or as mini cupcakes to ensure guests can enjoy a bite-sized treat.
4. For Holiday Gatherings:
Zebra cakes can be adapted to reflect the colors and spirit of the holiday being celebrated.
- How to do it: For Christmas, you could add green and red food coloring to the cake’s layers to make it festive. For Halloween, use orange and black frosting with spooky decorations like candy eyeballs or ghosts. Serve the zebra cake on a themed platter to fit the season’s decor.
5. For Afternoon Tea:
Zebra cakes are also great for afternoon tea parties, offering a sweet but not overly indulgent treat.
- How to do it: Serve small, bite-sized portions of zebra cake along with tea in delicate cups. You can cut the cake into small squares or slices and present them on tiered cake stands for an elegant presentation that pairs beautifully with finger sandwiches and tea.
Each of these serving ideas ensures that your zebra cake is perfectly tailored to the occasion, making it a delightful and memorable dessert for any celebration.
Storing Zebra Cakes to Maintain Freshness
Properly storing your zebra cakes ensures they stay fresh, moist, and delicious for longer. Here are the best practices to keep your zebra cakes at their best:
1. Room Temperature Storage (Short-Term)
For short-term storage, you can keep zebra cakes at room temperature, especially if you’re serving them within a few days.
- How to do it: Cover the zebra cake with a cake dome, plastic wrap, or place it in an airtight container to prevent it from drying out. Store it in a cool, dry place away from direct sunlight. It will typically stay fresh for up to 3 days at room temperature.
2. Refrigerating Zebra Cakes (Medium-Term)
If you plan to store your zebra cake for a few more days, refrigeration is a great option.
- How to do it: To refrigerate the cake, cover it with plastic wrap or place it in an airtight container to avoid it absorbing any odors from the fridge. Zebra cakes can last for up to 1 week when refrigerated. However, make sure the cake is fully cooled before placing it in the fridge to avoid condensation.
3. Freezing Zebra Cakes (Long-Term)
For long-term storage, freezing is the best way to preserve the freshness and flavor of your zebra cake.
- How to do it: If you plan to freeze your zebra cake, ensure it is completely cooled. Wrap the cake tightly in plastic wrap and then in aluminum foil to protect it from freezer burn. Alternatively, you can place it in an airtight, freezer-safe container. Zebra cakes can be frozen for up to 3 months. When ready to enjoy, allow the cake to thaw in the fridge or at room temperature before serving.
4. Storing Individual Portions
If you’ve already sliced your zebra cake or made mini versions, storing individual portions can help keep the cake fresh for longer.
- How to do it: Place individual slices or mini zebra cakes in small, airtight containers or plastic wrap. This prevents the cake from drying out and ensures each piece stays fresh. Store the slices in the fridge or freezer, depending on how long you intend to keep them.
By following these storage guidelines, you can maintain the moisture and freshness of your zebra cake, ensuring it stays as delicious as when it was first made.
Tips for Making Zebra Cakes Ahead of Time for Parties or Events
Preparing zebra cakes ahead of time can save you stress and help ensure everything is ready for your event. Here are some helpful tips to make your zebra cake in advance while maintaining its freshness and taste:
1. Bake and Store the Cake Layers
You can bake the zebra cake layers a day or two before the event.
- How to do it: Once the cake layers are completely cooled, wrap each layer tightly in plastic wrap. This prevents them from drying out and helps retain moisture. You can store them at room temperature for 1-2 days or refrigerate them for up to 5 days if you want to prepare them even further ahead.
2. Frost the Cake in Advance
If you’re planning to frost your zebra cake, it’s best to frost it a day before the event.
- How to do it: Once the cake is frosted and decorated, place it in an airtight container or cover it with a cake dome to prevent the frosting from hardening or getting stale. Store it in the fridge if your frosting contains dairy or requires refrigeration, and it will stay fresh for up to 2-3 days.
3. Freeze for Longer Storage
To prepare zebra cakes even further in advance, freezing is a great option.
- How to do it: Once the cake layers have cooled, wrap each layer tightly in plastic wrap and foil, then freeze them for up to 3 months. If you’ve already frosted the cake, you can freeze it by placing the frosted cake in the freezer for an hour until the frosting sets, then wrapping it in plastic wrap and foil. When ready to serve, thaw it in the fridge overnight and let it come to room temperature before serving.
4. Prepare the Cake Decorations Ahead of Time
If you’re planning to decorate the zebra cake with additional elements, you can prep the decorations ahead of time.
- How to do it: Decorate with sprinkles, colored frosting, or other toppings just before serving to avoid them getting soggy or losing their texture. However, if you’re using fondant, it can be prepared in advance and stored in a cool, dry place.
5. Slice and Portion in Advance
To make serving easier at parties, you can slice the zebra cake before the event.
- How to do it: Slice the cake into individual portions and store them in an airtight container. This makes it easy to serve to guests without having to cut the cake at the event. You can store the individual pieces in the fridge if needed and serve them directly.
By following these tips, you can easily prepare zebra cakes ahead of time for any party or event, ensuring that you’re well-prepared and stress-free while still delivering a delicious and beautifully presented dessert.
Use of “Delicious Zebra Cake Ideas” for Presentation Tips
Presentation plays a key role in making your zebra cake stand out at any event. Here are some creative and delicious zebra cake ideas for an eye-catching and impressive display:
1. Layered Cake Design
One of the most striking ways to present a zebra cake is by showcasing the iconic zebra stripes.
- How to do it: Stack multiple layers of zebra cake with alternating layers of chocolate and vanilla batter to highlight the striking contrast. Use a cake stand to elevate the presentation. You can frost the outer layers and allow the zebra pattern to remain visible on the sides for a beautiful visual effect.
2. Individual Mini Zebra Cakes
For a more personal touch, mini zebra cakes make an adorable and easy-to-serve option.
- How to do it: Bake the zebra cake in muffin tins or small cake pans. Frost each mini cake individually, adding fun toppings like sprinkles, chocolate chips, or even edible glitter for a festive look. This allows guests to enjoy individual portions without cutting into the main cake.
3. Decorative Frosting Designs
Emphasize the beauty of zebra cakes with creative frosting designs.
- How to do it: Use contrasting colored frosting (like white, dark chocolate, or pastel colors) to create an eye-catching design. Try piping intricate patterns on top of the cake or even creating a border with decorative icing to highlight the cake’s stripes. A simple swirl of frosting on top can elevate the appearance.
4. Adding Edible Toppings for Flair
Toppings can enhance both the flavor and appearance of your zebra cake, making it even more tempting.
- How to do it: Consider adding colorful toppings such as fruit (strawberries, raspberries), edible flowers, or chocolate shavings. You could also sprinkle crushed nuts, like almonds or hazelnuts, around the base or on top for added texture. For a holiday or celebratory feel, use themed sprinkles or candy decorations.
5. Zebra Cake with a Drizzle or Ganache
For a glossy finish that’s both delicious and decorative, drizzle ganache or a simple glaze over the zebra cake.
- How to do it: Prepare a smooth chocolate ganache or a vanilla glaze and drizzle it generously over the top. The glaze adds a shiny, polished look and complements the flavors of the cake. You can let it drip down the sides for a cascading effect or keep it concentrated on the top for a more refined look.
6. Themed Decoration for Special Occasions
For birthdays or special events, customize your zebra cake to fit the theme of the celebration.
- How to do it: You can decorate the cake with matching themed toppers, such as birthday candles, personalized cake toppers, or figurines. For a jungle-themed party, add small toy animals like zebras or giraffes. For a festive occasion, consider adding gold or silver accents for a glamorous look.
By using these “delicious zebra cake ideas,” you can make your cake not only taste amazing but also become a visual centerpiece at any event, leaving a lasting impression on your guests.
Want more cake decoration ideas? Visit Wilton for professional cake decorating tools and techniques.
Conclusion
Zebra cakes are a delightful and visually stunning dessert that combines the best of both chocolate and vanilla flavors. From understanding the key ingredients, like the importance of the chocolate and vanilla balance, to mastering the technique of achieving perfect zebra stripes, every step contributes to the creation of this mouthwatering treat.
When it comes to decorating, the possibilities are endless. Whether you choose to frost the cake with creative designs, add fun toppings, or serve it as individual mini cakes, zebra cakes can easily be tailored to any occasion. The tips for making the cake moist and fluffy, ensuring consistent layers, and troubleshooting common mistakes will help you achieve the perfect result every time.
Now it’s time for you to give this easy zebra cake recipe a try! Experiment with your own decoration ideas and make it your own. We’d love to hear how your zebra cakes turn out. Don’t forget to comment below with your experience or share photos of your zebra cake creations. Happy baking, and enjoy the sweet success of your zebra cake masterpiece!